Microsoft excel : cara menyembunyikan formula

16.15.00 1 Comment
Ditempatku bekerja pernah ada pertanyaan : "bagaimana supaya formula pada excel terhiden atau tidak bisa dilihat ?
Jawab : ikuti langkah berikut :D
disini menggunakan microsoft excel 2007

Untuk menyembunyikan formula, pertama – unprotect semua cell dalam sheet, kemudian pilih row dan column lalu klik kanan lalu keluar popup menu terus pilih “format cells”

Ketika format cells window keluar, pilih protection tab. Unceck “Locked” checkbox. Kemudian checkHidden” lalu klik tombol OK.

Supaya formulanya ter-hidden, worksheetnya juga harus diprotect, untuk melakukannya, select Review tab pada toolbar lalu klik Protect SheetProtect Sheet” window akan tampil. Beri password jika ingin. Password disini bersifat optional. Lalu klik tombol OK

Yep, formulanya sudah tidak muncul lagi di edit bar ketika cell dipilih


Microsoft Excel : Mengatasi Circular Reference

19.54.00 4 Comments
Excel Circular Reference :
cara mengatasi circular reference - sagari-troubleshooter.blogspot.com
hal ini terjadi jika rekan - rekan menuliskan formula excel yang merujuk pada cell sendiri
contoh jika rekan - rekan menuliskan formula di cell A5 dengan formula =sum(A1:A4) sedangkan di A3 terdapat formula =A5*10, formula ini dapat memicu terjadinya "Excel Circular Reference" karena di Cell A5 terdapat formula yang merujuk ke A5 itu sendiri(di cell A3 dengan formula =A5*10).
contoh lagi perhatikan gambar
cara mengatasi circular reference - sagari-troubleshooter.blogspot.com
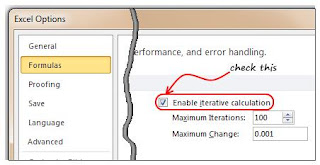
masing - masing cell tersebut merujuk satu sama lain, supaya cell tersebut dapat terhitung, enable-kan "iterative calculation" pada excel option
dengan cara :
  • klik tombol office
  • klik excel option(dibawah sendiri)
  • klik tab formula
  • centang Enable iterative calculation
  • klik ok
cara mengatasi circular reference - sagari-troubleshooter.blogspot.com
versi lama(~2003)

  • Klik menu > [tool] > [Option] > [Calculation Tab]
  • centang Iterative Calculation box


Untuk mencari lokasi circular references
Dengan cara :
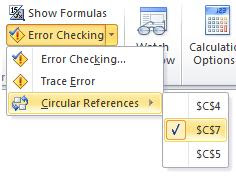
  • klik pada formula pada ribbon 2007
  • cari tab formula auditing
  • klik drop down menu pada error checking
  • lihat di circular references
cara mengatasi circular reference - sagari-troubleshooter.blogspot.com
Note : pada excel 2003 rekan - rekan dapat menemukannya di Menu > [View] > [Toolbars] > [Circular References]


credit to : chandoo.org
Perbedaan OEM, OLP dan FPP

Perbedaan OEM, OLP dan FPP

09.19.00 Add Comment
akhirnya saga beli juga yang namanya software original hihihi, ternyata license untuk software original dari microsoft itu ada 3 jenis(cmiiw) nah sekarang saga mau bagi - bagi nih informasi tentang perbedaan setiap license yang dijual.
  • OEM : Original Equipment Manufacturing

License pada produk OEM ini melekat pada PC(komputer). license pada produk ini tidak bisa di transfer pada PC lain, jika terjadi kerusakan microsoft akan mencatat identitas prosesor dan motherboard, jika terjadi kerusakan maka OS/ sistem operasi yang sudah di install akan hangus


produk key dan aktivasi masing - masing komputer, COA(Certificate of Authencity = Bukti kepemilikan license) harus ditempelkan pada PC yang 1 license hanya untuk satu PC, keuntungan pada produk ini adalah harganya paling murah karena tidak ada box

    kesimpulan :
  • 1 license hanya untuk satu PC
  • COA harus ditempel di PC
  • jika hardware rusak tidak bisa di pindahkan
  • namun harganya murah, pemebliannya dapat melalui toko komputer terdekat


  • OLP : Open license Program

License melekat pada organisasi atau perusahaan dan dapat ditransfer pada PC lain pada perusahaan yang sama. syarat pembelian adalah 5 unit untuk pertama kali, dan dalam jangka waktu 2 tahun dapat melakukan pembelian minimal 1 unit, setelah 2 tahun kembali lagi minimal 5 unit, customer dapat melakukan downgrade, proses memakan waktu 1 sampai 2 minggu dan mendapatkan srtifikat license untuk mendapatkan aktivation key dari website yang ada pada sertifikat dengan login customer sendiri(jika baru customer membuat akun dulu) installernya bisa dari media kit(dijual terpisah) atau download dari website.

Data - data yang dibutuhkan

NPWP dan email administrator IT tiap perusahaan

    Kesimpulan :
  • 1 license atas nama perusahaan berupa sertifikat
  • dapat diinstall sejumlah yang telah dibeli,
  • jika hardware rusak dapat di pindahkan


  • FPP (Full Package Product)
  • License melekat pada pembeli dan tidak perlu menempel COA karena sertifikat sudah menempel di box,
  • 1 license untuk 1 PC
  • bisa di pindah jika terjadi kerusakan dihardware lama
  • harganya paling mahal

aktivasi dan registrasi aktivasi untuk windows harus dilakukan sebelum 30 hari setelah penginstalan, sedangkan untuk microsoft office harus dilakukan sejak pertama kali menjalankan aplikas tersebut

Membuat dan menjaga Password dengan baik

Membuat dan menjaga Password dengan baik

10.31.00 Add Comment
Inti dari password sebenarnya adalah kerahasiaan rekan - rekan. seberapa jauh atau kuat rekan - rekan memegang password anda untuk tidak diberitahuakan kepada orang lain, atau memudahkan orang lain untuk menebak password rekan -rekan, oleh karena itu jika telah selesai mamakai sebuah aplikasi, baik itu email, facebook ataupun yang lainnya segeralah melakukan sign out atau keluar, bila memungkinkan rubahlah password rekan - rekan secara regular, misalnya sebulan sekali atau bila bersiko tinggi rubahlah seminggu sekali atau bahkan setelah memakai aplikasi itu.

tetapi jika nada adalah seorang pelupa maka untuk mempermudah mengingat password buatlah pola password yang hanya diketahui oleh anda, tetapi ingat kata - kata tersebut hanya anda dan Tuhan saja yang tahu, contoh jika nama anda adalah sagari buat saja [email protected].! - tapi hindari penggunaan nama untuk password.

ada beberapa tips untuk membuat password :

  • Gunakan kombinasi angka dan huruf
  • Buatlah password yang panjang, semakin panjang semakin susah di tebak
  • Gunakan karakter seperti @#$%^&*., atau yang lainnya
  • Hindari penggunaan password yang sama untuk beberapa akun online
  • Jangan memakai password berdasarkan dengan penggunaan dictionary/kamus
  • Jika memungkinkan ganti password rekan - rekan secara berkala
  • Jika sudah selesai menggunakan situs - situs online segeralah me-logout/ sign out/ keluar dan
  • Jika berada di warnet atau tempat umum restartlah komputer yang selesai anda pakai

Excel 2007 : Mengatasi "Cannot shift object off sheet"

11.33.00 9 Comments
cara mengatasi cannot shift object off sheet excel - sagari-troubleshooter.blogspot.com
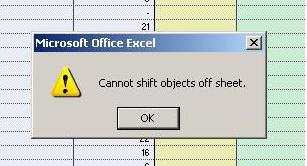
Jika rekan - rekan juga pernah mengalami kejadian "cannot shift object off sheet" lihatlah beberapa hal berikut ini :
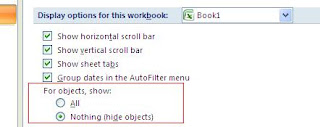
Katanya microsoft ini adalah sebuah bug yang ada di microsoft word 2007 dengan tidak sengaja menekan shortcut keyboard [CTRL + 6] sehingga Nothing(hide objects) terpilih pada display options for this workbook di excel option.
untuk mengubah dengan cepat antara option ini gunakan tombol keyboard kombinasi [CTRL + 6] , lho bukannya tadi hal ini terjadi gara - gara menekan shortcut ini ? benar sekali, jika rekan - rekan tadi tidak sengaja menekan shortcut [CTRL + 6] untuk memindahkan dari all ke Nothing(hide objects) nah kalau di tekan lagi maka akan mengubah kembali dari Nothing(hide objects) ke All juga sebaliknya jika ditekan lagi maka akan berganti lagi(tested).

Bagi rekan - rekan yang ingin mempraktekan cara tersebut atau ingin mengubahnya secara manual bisa melalui :
  • klik tombol Microsoft Office lalu klik Excel option.
  • pada tab Advanced, cari Display option for this workbook.
  • dibawah For object, show pilih All
cara mengatasi cannot shift object off sheet excel - sagari-troubleshooter.blogspot.com

jika "cannot shift object off worksheet" masih muncul lagi meskipun sudah mencoba cara sebelumnya mungkin karena ada "comment, gambar, atau grafik" yang berada pada cell diakhir worksheet grid, karena untuk hide atau insert kolom ada batasanya(XFD), berikut ini adalah beberapa tips untuk menemukan object :
  • untuk mencari akhir cell pada worksheet yang berisi data tekan tombol kombinasi keyboard [CTRL + END]
  • untuk mencari dan menghapus comment tekan F5. pada Go to dialog box klik Special, pilih comment kemudian klik ok untuk menghapus comment klik kanan cell yang mempunyai comment kemudian klik Delete comment
  • Untuk mencari object dan grafik Tekan F5, pada Go to dialog klik Special, pilih object kemudian klik ok, jika sudah ketemu rekan - rekan bisa menghapus atau memindahkan object tersebut

note : masalah ini biasanya muncul ketika ingin meng-hide atau insert column, masalah yang sama mungkin bisa terjadi pada row tapi jarang karena jumlah row yang banyak(1048576)


Excel 2007 : Mengatasi "Print titles must be contiguous and complete rows or columns"

11.21.00 1 Comment

Tadi pagi saga mendapatkan masalah ini Print titles must be contiguous and complete rows or columns ketika mau mencetak sebuah document.
cara mengatasi print title must be contiguous and complete rows or columns - sagari-troubleshooter.blogspot.com
Sebelumnya masalah ini pernah melanda namun bisa teratasi dengan :
Menghapus isian ”print area, rows to repeat at the top dan columns to repeat at left” pada menu :
  • [page layout]
  • dan klik [print titles]

cara mengatasi print title must be contiguous and complete rows or colums - sagari-troubleshooter.blogspot.com


dan entah mengapa kali ini cara ini tidak berhasil mengatasi masalah “Print titles must contiguous and complete rows or columns” akhirnya saga berselancar dan terdampar di answers.microsoft.com :D.
Penjelasan di halaman tersebut sebenarnya merupakan solusi para pengguna Excel untuk menjawab permasalahan “Error Print titles” yang ditanyakan seorang pengguna Excel dan solusi yang memiliki vote terbanyak saga coba dan berhasil dengan baik
Berikut ini solusinya: dengan kondisi document ‘bermasalah ’ telah terbuka
  • klik pada menu [Page Layout]
  • selanjutnya klik pada icon [Print Titles],
  • kemudian pilih “blank” pada [Cell error as :]
  • dan klik ok
cara mengatasi print title must be contiguous and complete rows or colums - sagari-troubleshooter.blogspot.com

nah kira - kira seperti itulah :D


Creating Your Own Run Commands | Membuat sendiri perintah Run

Creating Your Own Run Commands | Membuat sendiri perintah Run

11.39.00 Add Comment

Creating Your Own Run Commands | Membuat sendiri perintah Run

You will use a few programs very frequently. One way to make them start faster is to give them their own Run command:

  • Win + R to open the Run dialog
  • Enter %windir% to open the Windows directory
  • Alt > F > W > S to open the File menu, choose the New menu item, then the Shortcut menu item
  • Go through the wizard to create a shortcut to the desired program
  • The name you give the shortcut is what you type in the Run dialog to start the program


Jika rekan – rekan sering membuka data atau program yang sama, salah satu cara supaya dapat membuka data atau program tersebut dengan cepat adalah dengan membuatkan mereka Run Command , berikut ini adalah bagaimana membuat Run command sendiri :

  • Win + R untuk membuka Run dialog
  • Ketik %windir% untuk membuka folder windows
  • Tekan Alt > F > W > S atau klik menu file >> new >> Shortcut
  • Masukan data yang ingin dibuatkan Run command pada pembuatan shortcut tersebut>
  • Nama yang rekan – rekan berikan pada shortcut tersebut adalah yang dipakai di Run dialog untuk memulai program

itulah salah satu cara membuat run commands atau membuat perintah run sendiri

Perbedaan versi 32-bit dengan 64-bit

Perbedaan versi 32-bit dengan 64-bit

11.48.00 Add Comment
source : around the net

Perbedaan versi 32-bit dengan 64-bit

Sebelum membahas system operasi versi 32bit atau 64it, ada baiknya rekan - rekan mengetahui komputer atau laptop rekan - rekan itu menggunakan versi yang mana ? caranya start >> control panel >> system atau klik kanan my computer dan pilih properties, atau dari run command ketik sysdm.cpi, atau shortcut simbol windows + pause break disana rekan - rekan bisa melihatnya jika x86 bila menggunakan system 32 dan x64 jika menggunakan system 64.

Pada dasarnya perbedaan system 32bit degnan 64bit terletak pada processornya, jika cpu rekan - rekan generasi pentium 3 kebawah sudah pasti systemnya menggunakan 32bit. untuk OS mulai XP sampai sekarang sudah ada 32bit dan 64 bit, tetapi system operasi dibawah windows XP masih menggunakan 32bit.

Kata “bit” mengacu pada cara komputer menangani informasi dalam kode binary, dimana seluruh data dikenali sebagai serangkaian angka digit yang terdiri dari 1 atau 0. Masing-masing digit dihitung sebagai satu bit, yang artinya prosesor 32-bit dapat memproses 32 digit sekaligus.

Pada teorinya system 64bit lebih cepat dalam memproses suatu data dibandingkan dengan system 32bit. ada batasan matematis yang signifikan terhadap dua jenis prosesor. prosesor 32bit hanya dapat bekerja dengan kapasitas memori maksimal mencapai 4GB dan biasanya dibatasi 2GB setiap satu DIMM memory. Sementara prosesor 64bit secara teori dapat bekerja dengan kapasitas hingga 17 juta GB.

sebelumnya mustahil untuk satu program memerlukan memory dalam jumlah besar, namun beberapa game - game modern saat ini melebihi batas tersebut, mungkin karena alasan inilah prosesor 64bit menjadi sangat populer.

Untuk saat ini banyak software dan perangkat lunak yang support dengan system 32bit namun untuk system 64bit masih jarang, akan tetapi tidak sedikit software 32bit yang diinstall di 64bit, kecuali driver dan anti virus harus diinstall sesuai versi system yang diinstall.

Saga rasa itulah perbedaan antara system 32bit dengan 64bit, jikalau ada kekurangan kata bisa rekan - rekan semua betulkan

Run Command in Windows

Run Command in Windows

14.11.00 Add Comment
source : various place on the net and my experienced

Common Tasks with Run Command Below is a list of run commmand you can type

Program Run Command
Run Calculator calc
Run Command Prompt cmd
Run Firefox(if installed) firefox
Run Internet Explorer iexplore
Run Microsoft Word [if installed] winword
Run Microsoft Excel [if installed] excel
Run notepad notepad
Run wordpad wordpad
Open Control Panel control panel
Open Program Files folder %programfiles%
Shutdown Windows shutdown
Restart Windows shutdown -r
Log Off Windows logoff
Registry Editor regedit
Task Manager taskmgr
Windows Update Launches wupdmgr

Infrequently Used Run Commands Below are a list of commands you can type into the Run dialog,

Program
Character Map charmap
Clipboard Viewer clipbrd
Freecell freecell
Hearts Card mshearts
Microsoft Chat /td> winchat
Minesweeper winmine
On Screen Keyboard osk
Remote Desktop mstsc
Spider Solitare spider
Telnet Client telnet
Windows Magnifier magnify
Control Panels
Accessibi;ity Controls access.cpl
Add Hardware Wizard hdwwiz.cpl
Add/Remove Program appwiz.cpl
Administrative Tools control admintools
Automatic Updates wuaucpl.cpl
Date and Time timedate.cpl
Display Properties desk.cpl
Folders Properties control folder
Font control fonts
Font Folder fonts
Game Controllers joy.cpl
Internet Properties inetcpl.cpl
Keyboard Properties control keyboard
Mouse Properties control mouse
Network Connections control netconnections
Network Setup Wizard netsetup.cpl
ODBC Data Source Administrator odbccp32.cpl
Password Properties password.cpl
Phone and Modem Options telephon.cpl
Power Configuration powercfg.cpl
Printer and Faxes control printer
Printers Folder intl.cpl
Scanner amd Cameras sticpl.cpl
Security Center wscui.cpl
Sound and Audio mmsys.cpl
User Account Management nusrmgr.cpl
Windows Firewall firewall.cpl
Computer Administration Tools
Computer Management compmgmt.msc
Device Manager devmgmt.msc
Disk Cleanup Utility cleanmgr
Disk Defragment dfrg.msc
Disk Management diskmgmt.msc
Disk Partition Manager diskpart
Dr. Watson System Troubleshooting drwtsn32
Driver Verifier Utility verifier
Event Viewer eventvwr.msc
Group Policy Editor[XP Prof] gpedit.msc
Local Security Settings secpol.msc
Local Users and Groups lusrmgr.msc
Performance Monitor perfmon
Resultant Set of Policy rsop.msc
Scheduled Tasks control schedtasks
Services Services.msc
Shared Folders fsmgmt.msc
System Configuration Editor sysedit
System Configuration Utility msconfig
Utility Manager utilman
Windows System Security Tool syskey
Computer Administration Tools
Application Data Folder %appdata%
Home Directory Drive %homedrive%
Home Directory %homepath%
Shared Home Directory %homeshare%
Temporary Folder %temp%
Windows Root Drive %systemdrive%
Windows Root Drive %windir%

Shortcut in the Windows 7 | Shortcut yang ada pada Windows 7

Shortcut in the Windows 7 | Shortcut yang ada pada Windows 7

10.00.00 Add Comment
Shortcut in the Windows 7
Symbol Description
Win + Up arrow maximize the current window
Win + Down arrow if the current window is maximized, restore it, if the current window is restored, minimize it
win + Left arrow dock the current window to the left half screen
if it is already docked left, it is moved to the right half screen
Win + Right arrow dock the current window to the right half of the screen
if it is already docked right it
Win + Home Minimize all but the current window
Win + Space Peek at the desktop
Win + [Plus sign] Zoom in
Win + [Minus sign] Zoom out
Managing Windows
Alt + F4 close active window
Alt + Tab Switch to previous actice window
Win + Tab Flip 3D, Repeat to switch window(like Alt + Tab)
Win + M Minimize all open windows
Win + Shift + M Undo all window minimization
Win + D Toggle showing the desktop
Starting Programs
Win + 1 Open the first program on your Quick Launch bar
Win + 2 Open the second program on your Quick Launch bar
Win + n Open the nth program on your Quick Launch bar
Win + U Open the ease of access center
Win + F Open the search window
Win + X Open the Mobility Center
Win + E Open Explorer
Win + R Open the Run window
Win + Pause Open the System Properties portion from the control panel
Ctrl + Shift + Esc Open Windows Task Manager
Viewing Folder With Explorer
Alt + Left arrow Go back
Alt + right arrow Go forward
Alt + Up arrow Go up a directory
Alt + D Move focus to address bar
Ctrl + Mousewheel Change the view type (extra large, small, list view, detail, etc)
if there is else above them please share it with us :)


Shortcut yang terdapat pada Windows 7

Symbol Deskripsi
Win + Panah atas maximize window yang di pakai
Win + Panah Bawah jika window yang dipakai maximize maka akan di restore, jika dalam keadaan restore akan di minimize
win + Panah Kiri Menempatkan window yang dipakai ke setengah layar sebelah kiri
jika sudah dikiri maka akan di pindahkan ke kanan setengah layar
Win + Panah Kanan menempatkan window yang dipakai ke setengah layar di sebelah kanan
jika sudah dikanan maka akan di pindahkan ke kiri setengah layar
Win + Home Meminimize semua window kecuali yang di pakai
Win + Spasi Mengintip ke desktop :D
Win + [Simbol +] Memperbesar Zoom
Win + [simbol -] Memperkecil Zoom
Memanagement Windows
Alt + F4 Menutup window yang dipakai
Alt + Tab Berpindah ke window yang diapaki sebelumnya
Win + Tab Membuka window secara 3D, Tekan lagi untuk Berpindah window(like Alt + Tab)
Win + M Minimize semua window yang terbuka
Win + Shift + M Membatalkan semua window yang di minimize
Win + D Memperlihatkan desktop
Memulai Program
Win + 1 Membuka program pertama yang ada di Quick Launch bar
Win + 2 Membuka program kedua yang ada di Quick Launch bar
Win + n Membuka program ke-n yang ada di Quick Launch bar
Win + U Membuka ease of access center
Win + F Membuka search window
Win + X Membuka Mobility Center
Win + E Membuka Window Explorer
Win + R Membuka Run window
Win + Pause Membuka System Properties dari control panel
Ctrl + Shift + Esc Membuka Windows Task Manager
Melihat Folder dengan windows Explorer
Alt + Panah Kiri Kembali ke folder sebelumnya
Alt + Panah Kanan Maju ke folder selanjutnya
Alt + Panah Atas Kembali ke direktori atasnya
Alt + D Memindahkan Cursor ke address bar
Ctrl + Mousewheel Mengubah view type (extra large, small, list view, detail, dll)
sekian dari saga jika terdapat shortcut yang tidak tercantum di atas, mohon masukannya :D

How to Reset Canon Printer Pixma iX4000 or iX5000 | Cara Mereset Canon Printer Pixma iX4000 dan iX5000

How to Reset Canon Printer Pixma iX4000 or iX5000 | Cara Mereset Canon Printer Pixma iX4000 dan iX5000

17.54.00 Add Comment
How to Reset Canon Printer Pixma iX4000 or iX5000

To reset counter Canon PIXMA iX4000 or iX5000 you printer must enter into service mode. Procedure to enter to service mode on Canon PIXMA iX4000 or iX5000 is as following :

  • Connect the Canon PIXMA iX5000 or iX4000 printer to the power cord. ( note : If the automatic power-on function is enabled in the printer, the printer enters the service mode for the first time, but it will never enter the service mode if the printer is turned off by the Power button. This is because the printer remains to be turned on internally if the power is turned off by the Power button. To prevent this, disconnection of the power cord is required before starting the printer in the service mode ) .
  • With the Canon PIXMA iX5000 or iX4000 printer powered off, while pressing the Resume/Cancel button, press and hold the Power button. (note : Don’t release the buttons. The Power LED lights in green to indicate that a function is selectable.)
  • While holding the Power button, release Resume/Cancel button. (Don’t release the Power button.)
  • While holding the Power button, press Resume/Cancel button 2 times, and then release both the Power and Resume/Cancel buttons.
  • When the Power LED lights in green, press the Resume/Cancel button 4 times to reset waste ink counter in the Canon Pixma iX5000 / iX4000. (note : If the Power LED does not light in green the printer does not enter the service mode, disconnect the power cord and plug it again. Then start from step 1 to start the printer in the service mode again).
  • At the end of the service mode, press the Power button.
Note: Each time the Resume/Cancel button is pressed, the Alarm and Power LEDs light alternately, Alarm in orange and Power in green, starting with Alarm LED.

Other specified number of time(s) according to the function listed in the table below.
Time(s) LED indication Function Remarks
0 times Green (Power) Power off
1 time Orange (Alarm) Service test print
2 times Green (Power) EEPROM information print
3 times Orange (Alarm) EEPROM initialization
4 times Green (Power) Waste ink counter resetting
5 times Orange (Alarm) Destination settings
6 times Green (Power) Print head deep cleaning (Cleaning of both black and color)

untuk mereset Canon Printer iX4000 atau iX5000 printer rekan - rekan harus masuk ke service mode. berikut ini procedure untuk masuk ke printer service mode :

  • Colokan kabel powernya iX4000 atau iX5000 ke stopkontak(atau sumber listrik).(catatan : jika printer automatic power on enable, printer akan masuk service mode untuk pertama kali, tetapi tidak akan pernah masuk ke service mode jika printer dimatikan dengan menekan tombol power dikarenakan printer masih menyala(internal) jika printer dimatikan dengan menekan tombol power. Untuk menghindari ini cabut/lepas kabel power dari stopkontak(sumber listrik) lalu colokan/pasang kembali kabel power ke stopkontak(sumber listrik) untuk masuk ke service mode).
  • Dengan printer iX4000 atau iX5000 dalam keadaan mati, ketika menekan tombol Resume/Cancel, tekan dan tahan tombol power(jangan lepaskan kedua tombol sampai power LED hijau)
  • Lepaskan tombol Resume/cancel, tombol power masih ditekan.
  • Tombol power masih ditekan, tekan tombol Resume/Cancel 2 kali dan lepaskan kedua tombol(tombol power dan Resume/cancel).
  • Ketika power LED menyala hijau, tekan tombol Resume/cancel 4 kali untuk mereset waste ink counter Printer pixma iX4000 / iX5000(jika power LED tidak menyala hijau printer tidak masuk ke service mode, lepaskan kabel power lalu pasang kembali dan ulangi langkah dari langkah 1 sampai printer masuk ke service mode)
  • Terakhir tekan tombol power, tunggu sampai printer diam
catatan : setiap kali tombol Resume/Cancel di tekan, alarm dan power LED menyala bergantian, alarm berwarna orange sedangkan power hijau, dimulai dengan alarm LED
BIOS Beep Codes

BIOS Beep Codes

10.08.00 Add Comment
BIOS Beep Codes

What is a BIOS Beep Code?
When you power on a computer the BIOS immediately takes control of the computer and performs the P.O.S.T (Power On Self Test). At the end of the POST the computer will play an audible 'BEEP' through either the PC's internal speaker of through speakers attached to the sound card (if you have a built-in sound chip). If the POST completed successfully without detecting any problems with then system will play a single short beep to let you know the test is complete and the computer will continue to startup and load the operating system.

If during the POST the BIOS detects a problem it will normally display a visual error message on the monitor explaining what the problem is. However, if a problem is detected before the BIOS initializes the video card, or a video card is not present or not detected then the BIOS will play several 'BEEPS' through the speaker to let you know there is a problem. Depending on the type of the BIOS you have the BIOS may play beeps in a specific pattern to indicate what the problem is, or play the same beep a number of times indicating the problem. It is very important that you pay close attention to the number and/or pattern of the beeps your computer plays on startup.

Below is a table of the most common AMI, Phoenix and Award BIOS beep codes.

AMI (American Megatrends International) BIOS Beep Codes.
AMI BIOS uses beeps of the same length and pitch. The error is displayed as a number of beeps. For example, 4 beeps indicated a timer failure.

BEEP CODE MEANING POSSIBLE CAUSE
1 Beep (No video) Memory refresh failure Bad memory
2 Beeps Memory parity error Bad memory
3 Beeps Base 64K mem failure Bad memory
4 Beeps Timer not operational Bad motherboard
5 Beeps Processor error Bad processor
6 Beeps 8042 Gate A20 failure Bad CPU or Motherboard
7 Beeps Processor exception Bad processor
8 Beeps Video memory error Bad video card or memory
9 Beeps ROM checksum error Bad BIOS
10 Beeps CMOS checksum error Bad motherboard
11 Beeps Cache memory bad Bad CPU or motherboard

Award BIOS Beep Codes
Award BIOS uses beeps of varying duration. A long beep will typically last for 2 seconds while a short beep will last only 1 second. Award BIOS also uses beeps of different frequency to indicate critical errors. If an Award BIOS detects that the CPU is overheating it may play a high pitched repeating beep while the computer is running.

BEEP CODE MEANING POSSIBLE CAUSE
1 Long, 2 Short Video adapter failure Bad video adapter Repeating (Endless loop) Memory error Bad memory or bad connection
1 Long, 3 Short Video adapter failure Bad video adapter or memory High freq. beeps (while running) CPU is overheating CPU fan failure Repeating High, Low beeps CPU failure Bad processor

Phoenix BIOS Beep Codes

Phoenix BIOS uses beep code patterns to indicate problems. In the table below the '-' indicates a brief pause between beeps.

Example: 1 - 1 - 2 would sound like BEEP (pause) BEEP (pause) BEEP BEEP
BEEP CODE MEANING POSSIBLE CAUSE
1 - 1 - 2 CPU / motherboard failure Bad CPU / motherboard
1 - 1 - 3 CMOS read/write failure Bad motherboard
1 - 1 - 4 BIOS ROM failure Bad BIOS chip
1 - 2 - 1 Timer failure Bad motherboard
1 - 2 - 2 DMA failure Bad motherboard
1 - 2 - 3 DMA failure Bad motherboard
1 - 3 - 1 Memory refresh failure Bad memory
1 - 3 - 2 64K memory failure Bad memory
1 - 3 - 3 64K memory failure Bad memory
1 - 3 - 4 64K memory failure Bad memory
1 - 4 - 1 Address line failure Bad memory
1 - 4 - 2 Parity error Bad memory
1 - 4 - 3 Timer failure Bad motherboard
1 - 4 - 4 NMI port failure Bad motherboard
2 - 1 - 1 64K memory failure Bad memory
2 - 1 - 2 64K memory failure Bad memory
2 - 1 - 3 64K memory failure Bad memory
2 - 1 - 4 64K memory failure Bad memory
2 - 2 - 1 64K memory failure Bad memory
2 - 2 - 2 64K memory failure Bad memory
2 - 2 - 3 64K memory failure Bad memory
2 - 2 - 4 64K memory failure Bad memory
2 - 3 - 1 64K memory failure Bad memory
2 - 3 - 2 64K memory failure Bad memory
2 - 3 - 3 64K memory failure Bad memory
2 - 3 - 4 64K memory failure Bad memory
2 - 4 - 1 64K memory failure Bad memory
2 - 4 - 2 64K memory failure Bad memory
2 - 4 - 4 64K memory failure Bad memory
3 - 1 - 1 Slave DMA failure Bad motherboard
3 - 1 - 2 Master DMA failure Bad motherboard
3 - 1 - 3 Interrupt controller failure Bad motherboard
3 - 1 -4 Slave IC failure Bad motherboard
3 - 2 -2 Interrupt Controller failure Bad motherboard
3 - 2 - 3
3 - 2 - 4 Keyboard control failure Bad motherboard
3 - 3 - 1 CMOS batter failure Bad CMOS battery
3 - 3 - 2 CMOS configuration error Incorrect setting
3 - 3 - 3
3 - 3 - 4 Video memory failure Bad video card or memory
3 - 4 - 1 Video init failure Bad video card or memory
4 - 2 - 1 Timer failure Bad motherboard
4 - 2 - 2 CMOS shutdown failure Bad motherboard
4 - 2 - 3 Gate A20 failure Bad motherboard
4 - 2 - 4 Unexpected interrupt Bad processor
4 - 3 - 1 RAM test failure Bad memory
4 - 3 - 3 Timer failure Bad motherboard
4 - 3 - 4 RTC failure Bad motherboard
4 - 4 - 1 Serial port failure Bad motherboard
4 - 4 - 2 Parallel port failure Bad motherboard
4 - 4 - 3 Coprocessor failure Bad motherboard or CPU.
9 - 2 - 1 Video adapter incompatibility Use a different brand of video card


beep Kode pada BIOS

apa itu beep kode pada BIOS
ketika rekan - rekan menyalakan komputer, BIOS dengan segera mengontrol komputer dan menjalankan P.O.S.T (Power On Self Test). di akhir POST komputer akan mengeluarkan bunyi 'beep' lewat internal speaker dalam PC atau speaker yang menancap pada sound card. jika proses POST selesai tanpa mendeteksi masalah maka system akan mengeluarkan 1 kali bunyi 'beep' yang pendek untuk start up dan membaca sistem operasi

jika dalam proses POST, BIOS mendeteksi masalah, komputer akan memunculkan pesan kesalahan pada layar monitor. tapi jika kesalahan terdeteksi sebelum menginisialisasi video card atau vga tidak terdeteksi, BIOS akan mengeluarkan beberapa bunyi 'beep' lewat speaker untuk memberitahukan user dimana kesalahan terjadi. tergantung pada jenis BIOS yang rekan - rekan miliki, BIOS mungkin mengeluarkan bunyi beep dalam pola tertentu atau bunyi yang sama beberapa kali untuk menunjukan masalah. hal ini sangat penting untuk rekan - rekan untuk memperhatikan jumlah atau pola dari bunyi beep di komputer rekan - rekan

berikut ini adalah beep kode yang sering terjadi pada AMI, Phoenix dan Award BIOS

AMI(American Megatrends International) BIOS kode

AMI BIOS menggunakan bunyi beep yang panjangnya sama. error ditampilkan dalam bentuk nomor beep. 4 beep mengindikasikan 4kali failure.

BEEP KODE DAN KEMUNGKINAN ARTINYA

1 beep : tidak ada video, memory reset failure for bad memory
2 Beeps : memory parity error Bad memory
3 Beeps :Base 64K failure Bad memory
4 Beeps : Timer not opertational bad motherboard
5 Beeps : processor error bad processor
6 Beeps : 8042 Gate A20 failure Bad CPU or motherboard
7 Beeps : Processor exception Bad processor
8 Beeps : Video memory error Bad video card or memory
9 Beeps : ROM checksum error Bad BIOS
10 Beeps : CMOS checksum error Bad motherboard
11 Beeps : Cache memory bad Bad CPU or motherboard

AWARD BIOS Beep kode
AWARD BIOS menggunakan bunyi beep berbagai macam variasi durasi. beep yang panjang kira - kira 2 detik dan beep pendek 1 detik. Award BIOS juga menggunakan bunyi beep dalam berbagai frequensi untuk mengindikasikan error, jika Award BIOS mendeteksi cpu yang overheat maka akan mengeluarkan bunyi beep yang berulang - ulang ketika komputer masih berjalan.
BEEP KODE DAN KEMUNGKINAN ARTINYA
1 Panjang, 2 pendek : Video adapter failure, Bad video adapter, berulang kali: Memory error bad memory atau bad connection.
1 panjang, 3 pendek : video adapter failure, bad video adapter atau memory, beep berfrequensi tinggi(ketika PC digunakan) CPU overheat CPU fan failure, repeating high, low beeps CPU failure, bad processor

Phoenix BIOS Beep kode
Phoenix BIOS menggunakan beep kode untuk mengindikasikan masalah. berikut ini adalah kode beep dari phoenix BIOS '-' menunjukan jeda singkat antara bunyi beep
contoh : 1 - 1 - 2 akan berbunyi seperti ini BEEP (jeda) BEEP (jeda) BEEP BEEP
kemungkinan masalah dari arti beep kode
1 - 1 - 2 : kegagalan CPU / Motherboard, CPU/ Motherboard buruk
1 - 1 - 3 : baca/tulis CMOS gagal, motherboard buruk
1 - 1 - 4 : kegagalan BIOS ROM , BIOS chip buruk
1 - 2 - 1 : Timer failure Bad motherboard
1 - 2 - 2 : DMA failure Bad motherboard
1 - 2 - 3 : DMA failure Bad motherboard
1 - 3 - 1 : Memory refresh failure Bad memory
1 - 3 - 2 : 64K memory failure Bad memory
1 - 3 - 3 : 64K memory failure Bad memory
1 - 3 - 4 : 64K memory failure Bad memory
1 - 4 - 1 : Address line failure Bad memory
1 - 4 - 2 : Parity error Bad memory
1 - 4 - 3 : Timer failure Bad motherboard
1 - 4 - 4 : NMI port failure Bad motherboard
2 - 1 - 1 : 64K memory failure Bad memory
2 - 1 - 2 : 64K memory failure Bad memory
2 - 1 - 3 : 64K memory failure Bad memory
2 - 1 - 4 : 64K memory failure Bad memory
2 - 2 - 1 : 64K memory failure Bad memory
2 - 2 - 2 : 64K memory failure Bad memory
2 - 2 - 3 : 64K memory failure Bad memory
2 - 2 - 4 : 64K memory failure Bad memory
2 - 3 - 1 : 64K memory failure Bad memory
2 - 3 - 2 : 64K memory failure Bad memory
2 - 3 - 3 : 64K memory failure Bad memory
2 - 3 - 4 : 64K memory failure Bad memory
2 - 4 - 1 : 64K memory failure Bad memory
2 - 4 - 2 : 64K memory failure Bad memory
2 - 4 - 4 : 64K memory failure Bad memory
3 - 1 - 1 : Slave DMA failure Bad motherboard
3 - 1 - 2 : Master DMA failure Bad motherboard
3 - 1 - 3 : Interrupt controller failure Bad motherboard
3 - 1 - 4 : Slave IC failure Bad motherboard
3 - 2 - 2 : Interrupt Controller failure Bad motherboard
3 - 2 - 3 :
3 - 2 - 4 : Keyboard control failure Bad motherboard
3 - 3 - 1 : CMOS batter failure Bad CMOS battery
3 - 3 - 2 : CMOS configuration error Incorrect setting
3 - 3 - 3 :
3 - 3 - 4 : Video memory failure Bad video card or memory
3 - 4 - 1 : Video init failure Bad video card or memory
4 - 2 - 1 : Timer failure Bad motherboard
4 - 2 - 2 : CMOS shutdown failure Bad motherboard
4 - 2 - 3 : Gate A20 failure Bad motherboard
4 - 2 - 4 : Unexpected interrupt Bad processor
4 - 3 - 1 : RAM test failure Bad memory
4 - 3 - 3 : Timer failure Bad motherboard
4 - 3 - 4 : RTC failure Bad motherboard
4 - 4 - 1 : Serial port failure Bad motherboard
4 - 4 - 2 : Parallel port failure Bad motherboard
4 - 4 - 3 : Coprocessor failure Bad motherboard or CPU.
9 - 2 - 1 : Video adapter incompatibility Use a different brand of
sekian dari saga